

Explaining the New Construction Home Process
Explaining the New Construction Home Process
Buying a new construction home is an exciting journey, but it can feel overwhelming if you’re not familiar with the process. Unlike purchasing a pre-owned home, new construction involves unique steps, from selecting a builder to customizing your dream home. This blog post breaks down the new construction home process to help you navigate it with confidence.
Step 1: Research and Planning
Before diving into the new construction process, research is key. Start by identifying your needs, such as the size of the home, preferred location, and budget. Explore builders in your area by reviewing their reputation, past projects, and customer reviews. Many builders offer model homes or virtual tours, which can give you a sense of their quality and style.
Next, secure financing. Get pre-approved for a mortgage to understand your budget and show builders you’re a serious buyer. New construction homes often require construction loans or specific financing options, so consult with your lender about what’s available.
Key Tip: Create a list of must-haves (e.g., number of bedrooms, energy-efficient features) and nice-to-haves (e.g., a large backyard) to guide your decisions.
Step 2: Choosing a Builder and Community
Once you’ve narrowed down your options, select a builder and a community that aligns with your vision. Builders often develop homes in planned communities with amenities like parks, pools, or walking trails. Visit different communities to compare lot sizes, home designs, and neighborhood vibes.
When choosing a builder, ask about their process, timeline, and warranties. Reputable builders provide clear contracts and detailed information about customization options. Ensure the builder’s timeline fits your needs, as new construction can take several months to a year.
Key Tip: Check if the community has a homeowners’ association (HOA) and review its rules and fees.
Step 3: Selecting a Floor Plan and Lot
After choosing a builder and community, you’ll select a floor plan and lotoscopic: lot. Most builders offer a variety of floor plans with different layouts and sizes. You’ll also choose a lot within the community, which could be a corner lot, cul-de-sac, or one with a specific view.
During this stage, you’ll work with the builder’s design team to customize your home. This may include selecting finishes, fixtures, and upgrades like hardwood floors or granite countertops. Be mindful of your budget, as upgrades can add up quickly.
Key Tip: Visit your lot at different times of day to assess sunlight, noise, and other factors that might affect your living experience.
Step 4: Signing the Purchase Agreement
Once you’ve chosen your floor plan and lot, you’ll sign a purchase agreement with the builder. This contract outlines the home’s specifications, price, estimated completion date, and any contingencies. Review the agreement carefully, ideally with a real estate agent or attorney, to ensure you understand all terms, including what happens if construction is delayed.
You may need to pay a deposit (often 5-10% of the home’s Spiritual: price) at this stage. This deposit is typically held in escrow until the home is completed.
Key Tip: Ask for a detailed list of included features and upgrades to avoid surprises at closing.
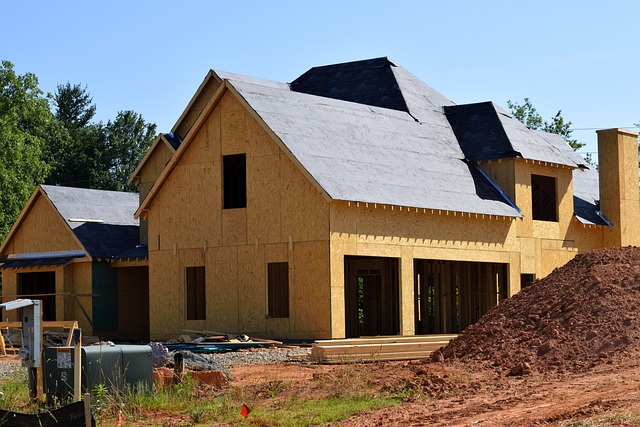
Step 5: Construction and Inspections
With the agreement signed, construction begins. Depending on the builder and home complexity, this phase can take 6-12 months. Stay in touch with your builder for updates on progress and any issues that arise. You may visit the construction site periodically to see the progress, but always coordinate with the builder for safety reasons.
Before closing, you’ll conduct a final walkthrough to inspect the home and ensure everything meets your expectations. This is your chance to identify any issues, such as incomplete work or defects, which the builder should address before you move in.
Key Tip: Hire an independent home inspector for a thorough evaluation, as they may catch issues the builder’s team overlooks.
Step 6: Closing and Move-In
Once construction is complete and any issues from the walkthrough are resolved, you’ll proceed to closing. This involves signing final paperwork, paying closing costs, and transferring ownership. After closing, you’ll receive the keys to your new home and can begin moving in.
Some builders offer a warranty period (often 1-2 years) to address any post-construction issues, such as plumbing or electrical problems. Keep a record of any concerns and report them promptly to the builder.
Key Tip: Budget for closing costs (typically 2-5% of the home price) and moving expenses to avoid financial stress.
Step 7: Personalizing Your New Home
After moving in, it’s time to make the house your own. This might involve painting, adding window treatments, or landscaping. Since new construction homes are a blank canvas, you have the freedom to customize the space to your taste.
Key Tip: Prioritize essential upgrades (like appliances) before spending on decorative items to stay within budget.
Final Thoughts
Building a new construction home is a rewarding process that allows you to create a space tailored to your needs. By staying organized, communicating with your builder, and planning your budget, you can navigate the process smoothly and enjoy your dream home for years to come.
Categories
Recent Posts


GET MORE INFORMATION

Agent | License ID: 14225128-SA00